Deploying TCP/IP Printers with Group Policy Preferences
It was possible to deploy printers to clients using the print manager or group policy prior to GP Preferences, but it was only possible to deploy shared printers. Personally, I don’t like shared printers because of the single point of failure of the print server. That server reboots or the queue locks up and nobody can print. Besides, why burden a server with print processing when you have all these workstations scattered around with spare clock cycles that could do their own printing?
The real problem is deployment. Users cannot add local printers or create TCP/IP ports without granting them way too many rights. If you have HP printers, you can use the HP Universal Print driver and have the users search for and add printers, but that requires user intervention. A better way was introduced with Group Policy Preferences, and that is the ability to deploy TCP/IP printers to the computers directly.
But first, we need to install and share the printer on a server. This seems counter-productive since we are trying to get away from shared printers, but this share is used as a deployment point for the driver and printer settings and is not required for printing. Once the printer is installed you can even turn off the server and still print. I assume you know how to install and share a printer so I will only cover a couple of key points.
Create a TCP/IP Port
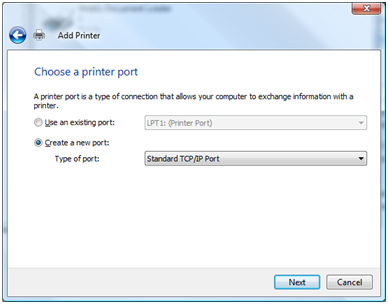
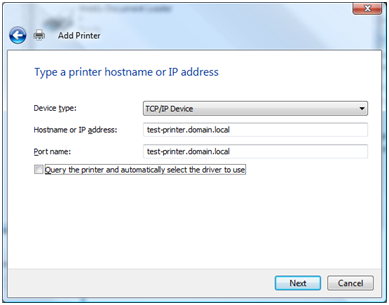
I prefer to use DNS FQDN for the printer port in case I ever need to change the IP address later. However, I have found that GP Preferences will create the workstation ports using the IP address instead of the FQDN – even if you enter the FQDN. If the IP address ever changes, the Update or Replace properties of the preference should change the IP address of the port deployed on the workstations, but I must admit that I have not tested this theory.
Once you create the port and install the printer, there is one other setting to check. Go to the Advanced tab of the Printer Properties and click on the Print Processor button at the bottom.
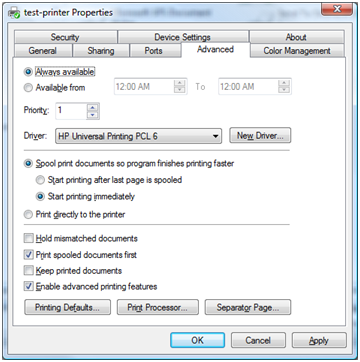
This will bring up the print processors available for use on this printer.

The workstation uses the shared printer for its initial settings, including the print processor. You must choose a print processor that is already installed on the workstations. In this example we have a couple of HP print processors from different versions of the HP Universal Print driver, an Office 2007 OneNote print processor and the standard WinPrint processor. Choosing the incorrect processor will prevent the printer from being installed and result in a Group Policy Printers error in the Application Log with Event ID 4098 that will say Group Policy object did not apply because it failed with error code ‘0x80070706 The print processor is unknown.’ If you get this error, just change the print processor on the server to something that is supported by the workstations.
Now that the shared reference printer is created, we can set up the deployed printer in GP Preferences.
TCP/IP printers can only be deployed to Computers, so create or open an existing GPO and expand Computer Configuration – Preferences – Control Panel Settings – Printers. Right-click and select New – TCP/IP Printer. That will open the New TCP/IP Printer Properties menu.

Although there are other actions available, we are only going to Create a printer. Initially the DNS Name: field will say IP Address: and have a box for entering the IP address in dotted decimal format, but I have checked the Use DNS name box and that changes the menu. Even though I entered a DNS name here, the port will still be created with the IP address. The Local Name is the name displayed in the Printers folder of the workstation and that is what the users will see. The Printer path is the path to the shared printer we created earlier and it must be available to install the printer. The Location and Comment fields are optional, but any additional information you can provide users is usually welcome – especially if they have to walk to the other side of the building to track down a print job sent to the wrong printer.
The Port Settings tab allows you to change options for the TCP/IP printer port, but I haven’t had to change anything here yet.
The Common tab is common to all GP Preferences objects but it has some special uses for printers.
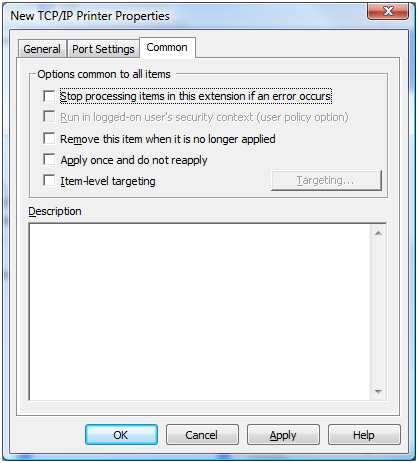
The Remove this item option will change the Action we set earlier to Replace. This will uninstall the printer if the computer is moved to a different OU, but the Replace action means the printer (and perhaps driver) will be continually updated. The event log messages will get annoying depending on the number of printers in your GPO so I suggest you use this option only when absolutely necessary. To reduce event log messages further, you could choose the Apply once option, but in my testing I left everything else alone.
Now you need to determine the GPO scope and deploy the printers, just remember that TCP/IP printers can only be deployed to computers – not users.
Managing the HP Universal Printer Using Group Policy
You can manage the HP Universal Print Driver via Group Policy by installing an ADM template provided by HP. HP also has documentation on how to install and use the HP_MPP_2. Adm template available here: http://h20338.www2.hp.com/Hpsub/downloads/UPD_Active_Directory_Template_white_paper.pdf
The document references 2003/XP, but the only difference for us 2008/Vista users is the location of the policy settings. Since the HP_MPP_2.ADM file is an ADM and not an ADMX file, the settings will be displayed under the Classic Administrative Templates folder of the Group Policy Management Editor.

I found the most useful setting to be Status Notification Pop-ups. The HP Universal Print Driver will, by default, display pop-up informational messages such as ‘Now Printing’, ‘Toner Low’, or other potential annoyances while printing. These messages caused the most complaints and confusion from my users, so I just turned them off via Group Policy.
HP Universal Printer Instructions
Note – Only HP printers are supported by the HP Universal Printer software. Not all features (such as browsing for device name) are available on all printer models.
The HP Universal Printer allows users to search for and add new printers. A standard user is not allowed to install printers, but the HP Universal Printer acts like a local printer and allows standard users to find and print to new printers.
Finding and Adding Printers by Name
Open the Printers and Faxes folder by going to Start – Settings – Printers and Faxes.
The HP Universal Printer is listed along with the rest of the installed printers.

To set the HP Universal Printer as your Default Printer, Right-Click on HP Universal Printer then choose Set as Default Printer
In order to print a document using the Universal Printer software, you must first select a physical print device with which the software can communicate. This is done through the Properties of the printer, which is accessed by right-clicking on the HP Universal Printer and selecting Properties.
Or you Double-Click on HP Universal Printer to open the printer.

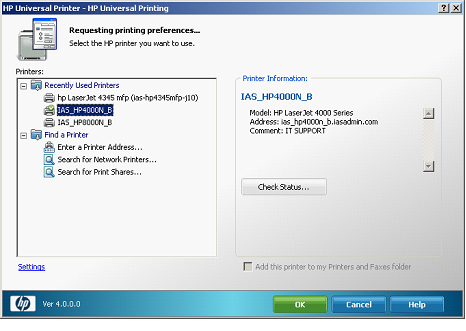
Then select Properties from the Printer menu item to open the HP Universal Printer Properties page. This is the page you will use to find and manage printers.

If you know the name of the printer (such as QPRA or IAS_HP8000N_B), you may add the printer by choosing Enter a Printer Address
Enter the name of the printer as found on the printer label (all names begin with IAS, or you may use the Unix QPR alias if applicable)

Click OK to add the printer.

To save the printer for future use, right-click on the printer, choose Move to Folder then choose Recently Used Printers, New Folder, or any other folder you have defined.

The printer is now saved in the folder you chose.
Add a Printer by Searching for Network Printers
Note – Not every printer supports this function
In order to search for network printers, the JetDirect card must support mDNS (aka Bonjour) so you may need to upgrade the JetDirect firmware. The default mDNS name is the model of the printer so I suggest you change it to your naming standards.
Open the Universal Printer Properties page.

Click on Search for Network Printers and you will see a list of available printers.

Scroll down to find the printer name.
Select the printer in order to view information about the printer, such a model and port address. The location of the printer will be listed in the Comment field if supported by that model.

Choose the printer and click OK to add the printer.

Right Click the printer and choose Move to Folder to save the printer for future use. You may choose the Recently Used Printers folder or any other folder you have defined.

The printer is now saved and ready for later use.
Add Shared Printers
You may also add shared desktop printers to your printers list.
Open the HP Universal Printer properties page.
Select Search for Print Shares.
You will need to enter the shared printer name by its Universal Naming Convention (UNC) name. These names are formatted \\computername\sharename so you will need to know the name of the computer to which the printer is connected.

Click on Ok to save the printer.
You may also save this printer to a folder for future use.
Adding a Local Printer
You may also add a locally attached printer (if you have one installed) to the list of printers in the HP Universal Printer software.
Open the HP Universal Printer properties page.
Under Find a Printer, select Enter a Printer Address.

You will add the printer using the name of the local port. If the printer uses a parallel cable, enter LPT1 into the address
If you get the following message, select Yes


The printer is now installed and can be saved to the Recently Used Printers folder or another folder of your choosing.
If the local printer is connected with a USB cable, you will first have to find the name of the port. Open the Printers and Faxes folder and locate the local printer you want to add.

Right-click on the printer and choose Properties to open the Properties page

Click on the Ports tab

You may have to scroll down until you locate the port with the check mark

DOT4_001 is the port name in this case.
Open the HP Universal Printer properties page.
Under Find a Printer, select Enter a Printer Address

Enter the port name and select OK


You may move the printer to a folder to save it for later use.
Change Settings
Open the HP Universal Printer properties page
Click on the Settings link in the lower left corner to open the Settings page.

The General tab allows you to change how the Universal Printer responds to printing requests from applications. If you prefer to print to different printers from different programs, choose Only prompt the first time a job is printed from an application. This allows you to print merge documents to one printer and screen prints to another printer. If you print to the same printer all the time, choose Only prompt if the last known printer is no longer available.
Since not all features are supported by all printers, you may need to change the Device Verification settings to work with your preferred printer. If you add a shared desktop printer to the Universal Printer, you may need to change the Verification setting to the lowest level.

Selecting the Printer in an Application
When the HP Universal Printer is selected as the default printer, you can print to any printer you have already added. You may also add printers if necessary.
The IAS_HP4000N_B is the last printer used and is marked with a green check mark.

Microsoft Office Applications
When you select Print from a Word document, the Print menu will appear. The HP Universal Printer is listed as the default printer. The Where: field shows HST_ias_hp4000n_b.iasadmin.com and this is the physical print device that will be used.

If you want to select a different physical print device, simply click on the Properties button next to HP Universal Printer. This will open the familiar HP Universal Printing properties page.
You may select a different saved printer or add a new printer using the techniques covered earlier.
Adobe
The Printing menu in Acrobat Reader is different and does not show the physical print device.

If you need to verify or change the physical print device, click on the Properties button next to the HP Universal Printer to launch the properties page. The print device with the green check mark is the currently selected print device. You may choose a different saved printer or add a new printer.
Create Printer Folders
You can create folders to manage your printers by right-clicking on Recently Used Printers in the HP Universal Printer properties page and choosing New Folder. You may also create a new folder when you choose Move to Folder – New Folder when saving a printer.

Click OK to create the folder. The folder will be listed under Recently Used Printers.

-
Archives
- February 2010 (1)
- February 2009 (1)
- January 2009 (2)
-
Categories
-
RSS
Entries RSS
Comments RSS
